Sunday, June 16, 2013

Going Vertical

Beginning of garden vertical frame
I've completed the vertical frame for my square foot garden.  It was a nice sunny day and I ended up with a sunburn, because I had forgotten what it's like to be in the sun.  Ahh, how we love these Michigan springs.

Let me walk you through the process.  I started with electrical conduit that I actually had from previous years.  I've probably had this conduit for 10 years or so.  Obviously it wears well and makes a sturdy frame that is easy to put up in the spring and take down in the fall.
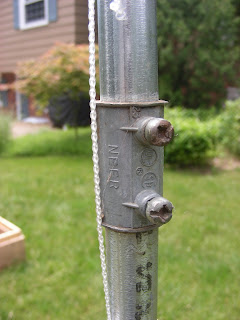
Coupling to connect the the shorter and longer side electrical conduit poles.
The height of my frame is about 6 feet.  I have a two poles about 6 feet long, three poles about 2 feet long and one pole 4 feet.   Since I used the electrical conduit for former square foot gardens the poles where already cut. 
 I believe the conduit can be purchased in 8 foot lengths.  It was so long ago I trying to remember.  

I drove the two 6 foot poles into the ground on either side of my 2x6 box.  I used a sledge hammer.  I tried to make them as even in length as possible, since I didn't want the top of my frame to look all catty wonkas (crooked).  I wanted them to be sturdy so I probably drove them into the ground about 2 feet. 

I then used the coupling shown above to connect the two 2 foot poles to the longer 6 foot poles I had just driven into the ground.   How handy is that?

Corner coupling.
At the end of the vertical 2 foot poles I used a corner coupling, shown above, to connect the 4 foot and 3rd 2 foot pole horizontally to the other vertical pole.  I love using these couplings because the poles slide neatly inside each end and all that is required is a tightening of the screws.  I used a straight coupling to connect the 4 foot and 2 foot poles together so I would have a horizontal top to my frame that was 6 feet in length.  Because I was working with previously cut poles I didn't have a nice 6 foot long pole to use, or trust me I would have.


Erected frame and beginnings of the netting.
I had purchased nylon netting from the local feed store.  Now I needed to attach it to the frame.  This was the fun part.  Ha!  How could it be so difficult to attach netting to a frame?  Once I figured out which strings to cut so I could use them as ties it went fairly well.  It just took a little trial and error.  Fortunately I had plenty of netting.  I would like to walk you through the "cutting strings" part in detail, but it was all a little fuzzy.  Hopefully it will be a logical and easy thought process for you to determine the "cutting" strings.  I apparently am not as logical as I thought, since I found it somewhat confounding.

Trying to determine which strings to cut.  Hmmm.
I had quite a few zip ties left over from the protective cage I had built so I used those to reinforce the corners and at strategic points along the poles.


The final result is looking good.


I'm happy to report that the garden is going gang busters.  I've harvested lettuce, parsley, basil, mint and cilantro.  I've got broccoli, peas, beans, zucchini, beets, tomatoes, leeks, garlic, arugula, kale and more growing strong.

Happy Gardening!
D:)

No comments:

Post a Comment